

Instructions for using laser caliper
机翻 · 通用领域
Customers often urgently call to inquire about the use of laser calipers. Calipers are precision measuring instruments, and only by mastering their correct operation and usage can they maximize their effectiveness and extend their service life. Today, the editor will talk to you about the usage of the Beijing Ruide standard laser caliper, hoping to be helpful to you. The specific operation methods of other models will be explained one by one in the future, please stay tuned!
1、 Introduction to Beijing Ruide Company
Beijing Ruide High tech Technology Co., Ltd. is located in Haidian District, Beijing, with a superior location and beautiful environment. It is a high-tech company specializing in the development, design, manufacturing, and sales of testing instruments. The company's main products include laser calipers, CCD calipers, laser displacement sensors, eddy current displacement sensors, pipe wall thickness measuring instruments, two-dimensional high-speed dimension measuring instruments, and other non-destructive testing instruments.
2、 Instructions for using Beijing Ruide standard laser caliper
Step 1: Upon receiving the caliper, immediately open the packaging and check if the laser caliper and its accessories are intact and undamaged.
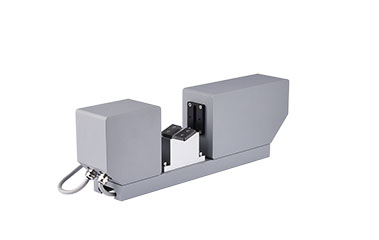
Step 2: The standard caliper consists of a sensor and a display, which are connected by an eight core communication cable. Please connect the 8-core communication cable to the display.
Step 3: Plug in the power cord and turn on the power switch button
Step 4: Parameter Setting
Parameter settings are set through the monitor, and the monitor image is as follows:
2、 Instructions for using Beijing Ruide standard laser caliper
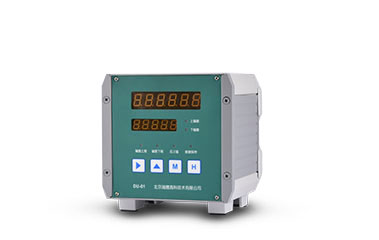
1. Nominal value setting:
Press the mode key "M" to switch to the nominal value setting mode, and the main display area will show P1. At this time, the nominal value indicator light will be on (the nominal value is the actual outer diameter value of the product to be measured). Press the position selection key "", select the data bit to be modified, and press the numerical adjustment key "▲" to modify the data.
2. Deviation upper limit setting:
Press the mode key "M" to switch to the deviation upper limit setting mode, and the main display area will show P2. At this time, the deviation upper limit indicator light will be on. Select the data bit to be modified by pressing the position selection key, and modify the data by pressing the numerical adjustment key ▲. After modifying the data, press the mode key "M" to switch to other modes.
3. Deviation lower limit setting:
Press the mode key "M" to switch to the deviation lower limit setting mode, and the main display area will show P3. At this time, the deviation lower limit indicator light will be on. Press the position selection key "", select the data bit to be modified, and press the numerical adjustment key "▲" to modify the data. After modifying the data, press the mode key "M" to switch to other modes.
If the laser caliper you ordered does not have any other special functions, you can use it normally by setting the above three parameters. During the use of the laser caliper, it is recommended to regularly wipe the protective window with non-woven fabric or eyeglass cloth dipped in anhydrous alcohol to keep the measuring window clean!


